This weekend, I posted some photos of my epic banner making adventure for the pride march in Nantes last month – and today I want to share some inspiration for another project I am planning to make this summer. I am all into making things with a message, queer/feminist crafting right now! Usually in summer, I am less into knitting, but this year, I discovered the joy of making little improvised neckerchiefs or bandanas out of cotton yarn. At the moment, I am making a striped one and a rainbow one for a baby, but I have bigger plans!
This knitted mini-banner will be one of my Summer of Basics garments!
There are many things happening around reducing waste, recycling, reusing, repairing… and a lot of it in the crafting world. I thought about how to reduce my own „waste production“ while crafting and put together some people and projects that inspire me. There are so many ideas out there! From actual Zero-Waste sewing patterns, to a million ways to use your scraps and tiny leftover fabric pieces.
So before I will talk about my own practice, here are some ideas I like:
Use your scraps to make quilt blankets, patch holes in other garments… etc.
Compost your scraps of natural fibers (that are dyed with natural colors!)
For my own practice, I implemented a little recycling system, and I hope it will help me to actually stop creating any waste:
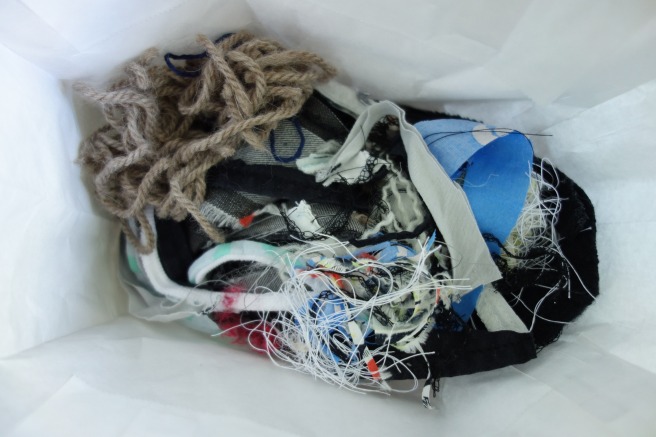
For the tiniest scraps, like cut thread, serger waste, etc. I set aside a paper bag to eventually use them as stuffing for a pillow, or if I will ever get to it, handmade toys.
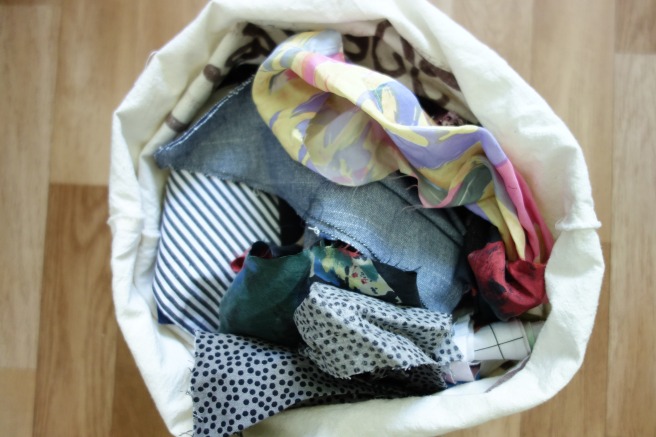
A tote bag holds all my small fabric scraps. They are too small to use for clothing, but could still become quilts, patches for holes in other clothes, or letters on a handmade banner.
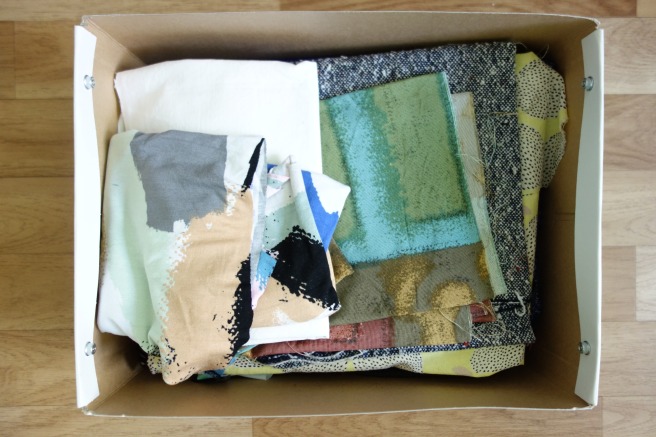
A small box holds the scraps that are big enough to be used for clothes, pouches, etc. This is actually my favorite treasure box! It holds cut off sleeves from gorgeous 80s silk shirts, pieces of great fabric that I used for other projects… And it is an immense source of inspiration for me! I go to it from time to time and make a patchwork top from silks, or leftover jersey. Making patchwork tops or pillowcases allows me to let my creativity go free, to play with colors and textures. The other day when I bought some beautiful new fabrics, one of my first thoughts was „I will have great scraps again!“.
Sorting the scraps by size helps me to access the ones I am looking for faster. It would probably make sense to sort them by material as well, but I don’t have enough shelf space for that.
How do you reduce waste while creating? Do you have some great ideas on how to use those small scraps?
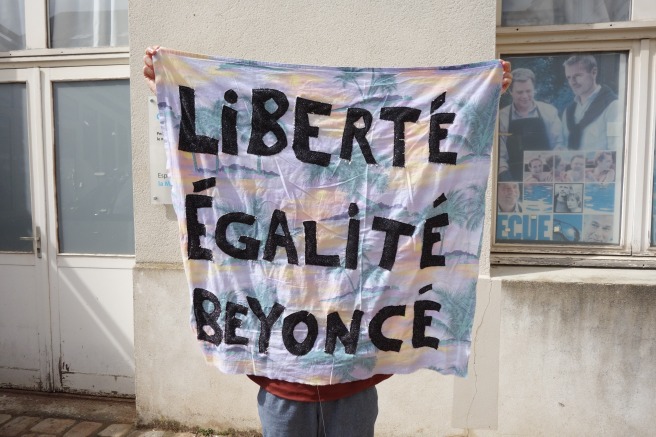
Handmade banner for the pride this year, made of recycled fabric and scraps!
I have recently bought two Japanese sewing pattern books (in Japanese!) by the talented pattern and fashion designer Asuka Hamada. I was hesitating to buy a sewing book in a completely foreign language at first, but the amazing designs in the books convinced me in the end! I gathered some tips and experiences on how to work with Japanese sewing books if you have absolutely no clue of the language and some photos of the designs in the two books below! However, as I just saw, translations are in the works (at least for German and French), if you can wait longer than me…
For the last years I went back and forth between „I want to sew jeans! It’s totally doable!“ and „No way, a zip fly is way too complicated. You don’t have to make EVERYTHING“. I just couldn’t decide if jeans-making was something that I would enjoy or actually could do, I was scared of the fitting part because buying jeans is my absolute nightmare. So I observed and admired all you jeans makers from afar and stayed with making elastic-waist pants. So you are wondering what changed my mind in the end? A good old pattern sale! When Heather from Closet Case Patterns announced her No Fear Jeans Month and pattern sale, I didn’t hesitate too long and finally bought the Morgan Jeans pattern.
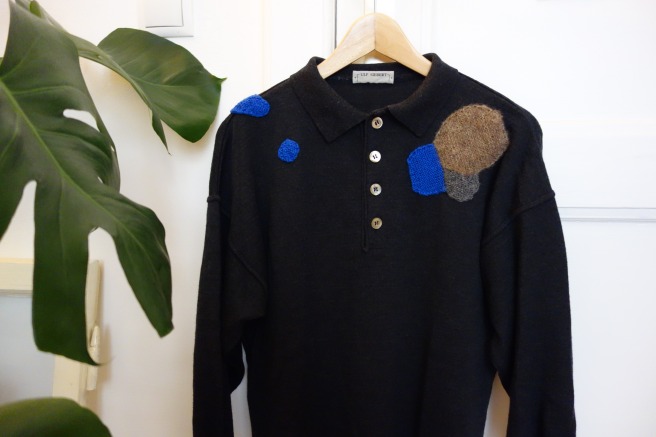
I found this sweater some years ago at my parent’s place, when my mother was sorting through clothes to donate or throw away. It’s a nice and simple wool sweater that nobody except moths were ever interested in: It had some bad holes in the shoulder area.
I made my first zine! Judging from the feedback that I got for my original period underwear article, you all are quite interested in making your own period underwear! So I thought it would be nice to improve the instructions, add extra tips and tricks and illustrate the whole process. And because I love zines and think there should be more sewing and knitting zines, I put it all in a zine! Working with a new medium has its challenges, but I really liked the process and I am already thinking of other zine ideas…
For this occasion I started an Etsy shop where you can find this little zine, and hopefully more in the future.
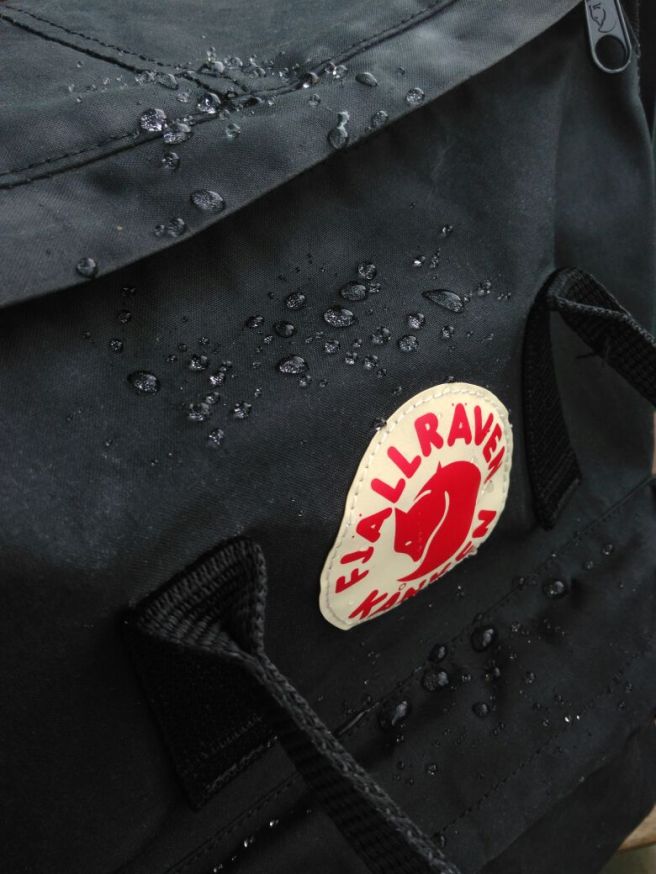
For a few years now, my go-to workhorse backpack is the Fjällraven Kanken. Its minimalistic design, perfect size and the fact that it’s foldable and lightweight makes it the perfect everyday backpack for me. The daily use, dust, and a recent bird shit made it very clear though, that if I want to enjoy this backpack for many more years, it urgently needs some care. So against the warnings not to do it, I threw it in the washing machine at low temperature for a first cleaning. And it turned out fine! Over the years and now in the machine the fabric lost most its waterproof finish and I bought a box of Fjällraven Greenland Wax to touch it up. However, when I saw the minuscule package of wax that I had bought for 6€, I was a bit shocked.
I quickly googled how to make your own „Greenland-Style“ waterproofing wax for fabric and it turns out to be super easy and simple! I should have trusted my DIY instincts right from the start… So I send the tiny Fjällraven wax back and made my own. Here is how:
The second part of my Summer of Basics outfit is done! My goal is to create an entire outfit, and now only the third and last part is missing. I am quite sure, I will manage to get the outfit done by the end of the month. My black silk shirt is cut and ready to assemble. So here is my second piece, my summer scarf! I wrote down the pattern, you can find it below or on Ravelry.
A few weeks ago I started knitting a cotton top, and simultaneously started to have pain and numb feelings in my hands and fingers – something that probably a lot of knitters, crocheters and other crafters can relate to. Maybe my hands got tired after a long season of intense knitting, maybe the texture of the cotton yarn challenged my hands in new ways… Anyway, the pain is gone now, but it left me thinking and reflecting on how I, as a knitter, can take better care of my most important tools – my hands.
I think it all starts with acknowledging the importance of my hands as my main instruments, and at the same time, accepting that they have their limitations, as do body and mind in general. I learned through many mistakes when I need to stop making (when I am getting too angry at the fabric for example…). And now I need to learn how to see the limits of power of my hands (and arms, shoulders, back…) to make sure they will enable me to make things in the future.
The most important thing for me is to change projects every now and then. From bamboo needles to metal ones, big yarn to thin yarn, from knitting to crochet to embroidery or sewing. Or even taking a break from fiber stuff sometimes and make a drawing or take photos. This gives my hands the needed change of movements to prevent them from hurting. Other things include giving myself a hand massage and using a nice hand cream.
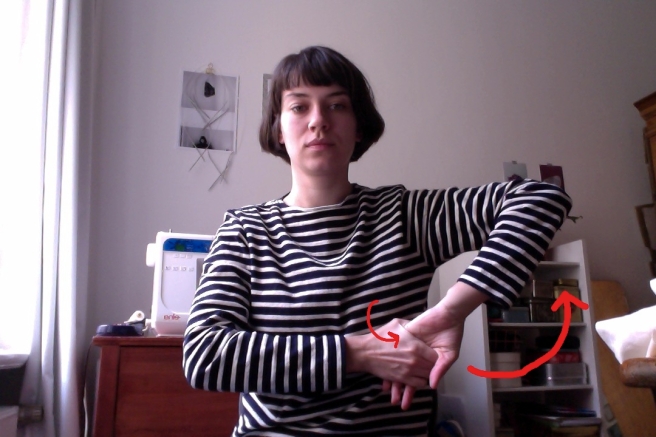
From my days doing actual sports I still remember my favorite stretching exercises for the hands, and I took pictures to share with fellow crafters. Take a moment before or after a knitting session and stretch:
Let’s start with the easiest: curl one hand into a fist and put light pressure on it with your other hand (repeat for both hands).Same principle as above: make your palms touch each other and apply pressure.Slightly more complicated: turn your right palm to the right side, and hug the right hand with your left hand. Your left thumb touches your right pinky finger. Apply pressure with your left thumb and at the same time pull your right thumb to the left – this creates a rotating motion. Additionally, pull your hands down. Repeat for the other side.Again, turn your right palm to the right side and hug it with your left. Move your elbows downward and at the same time pull your hands to your chest. Repeat for the other side.Turn your right palm to face forward and grab it with your left hand as if to shake your own hands. Rotate your left hand inwards (by applying pressure on your right pinky finger area) and move both hands upwards in a round motion. Repeat for the other side.
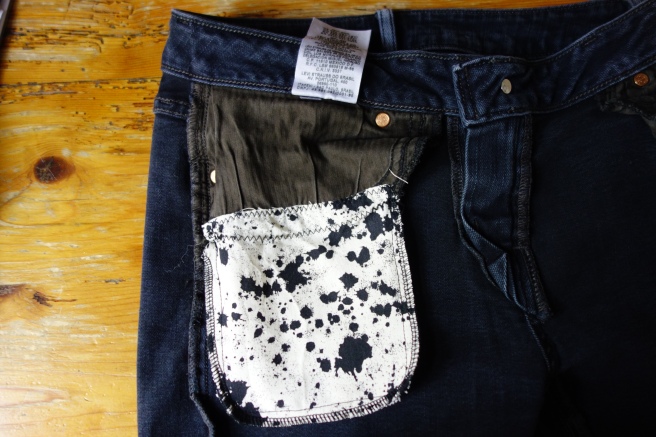
We all probably know these nice women’s jeans, well fitting, nice color… But then the usual disappointment: A move with the hands to the pockets – they’re tiny (or even worse: fake)! So tiny that your hands don’t even fit as fist, not even considering keys, phone or a wallet.
So I have these jeans, and the pockets don’t even fit the first half of my fingers. To make them more wearable I decided to give them an easy and invisible makeover (This also works for pockets that are ripped, have holes or a re worn out!):
This is how far my hand enters! Ridiculous!Tiny pockets from the inside.
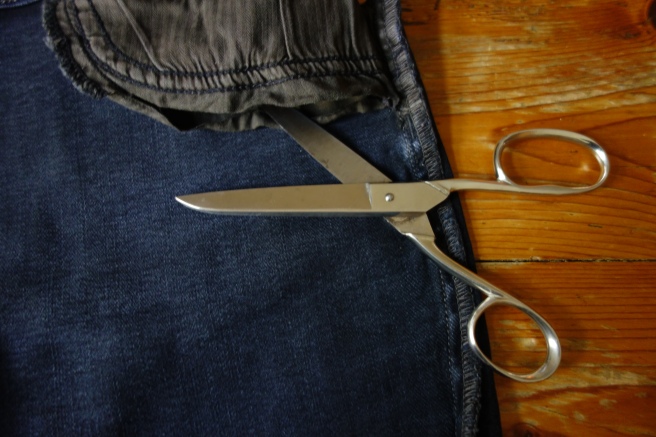
Step 1
Cut off the bottom seam of your pocket in a straight line, the pocket is now open.
Cut along the bottom of the pocket.
Step 2
Chose a nice non-stretchy fabric you have leftover from another project, you don’t need much. Measure the width of the pocket opening, and how much length you want to add to your pockets. You can do this by measuring your hands, your phone or the pockets of another pair of jeans that are big enough.
Step 3
Cut your new pocket rectangles from the fabric (add seam allowances!) and start by sewing the rectangles to the bottom of the original pockets. It doesn’t have to be especially beautiful, you won’t see the pockets from the outside of your pants.
Step 4
Close the side and bottom seams of your new pocket and finish the edges as desired.
New pockets!
Step 5
Try on and enjoy! Bury your hands in your new pockets! Stuff everything you need inside! No more annoying handbags at parties!