Recycle a Sweater!

I love the idea of turning old things into new things, and when I came across the review of the Sweater Unraveling Workshop at Have Company, I knew, that was something I want to try. First, though, you have to find the right sweater! Easier said than done: Most of the thrift stores here in Budapest have a spring/summer collection now, or sell their simple wool sweaters for more than 20€, which I found too expensive for the project. Then, you have to find a hand-knit one, or one that has no overlocked seams, plus a nice quality, no polyester or acrylic… I had already sort of given up on the topic, when I came across a giant hand-knit sweater in a nice light aqua shade.

DSC02237

You can find a really detailed description of how it works to turn an old sweater into brand new yarn on the Have Company website. Amber Martin of Harmony Society is a real expert! The little ebook walks you through all the steps  with a lot of details on how to do it.

Unraveling a sweater that I haven’t made was an interesting experience, especially because you see directly how much work went into this piece of clothing, the great construction and the skilled finishing of the sweater was telling me, that an experienced knitter was at work here. Knowing this makes it feel even better to give the material another life and turn it into something new. I like this idea of knitting as an endless craft that can be recycled over and over, once you don’t like the style of a garment anymore.

DSC02272

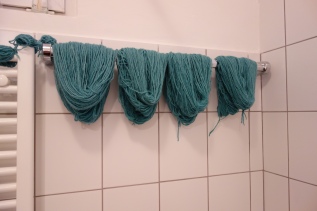
The unraveled sweater, 650g of pure wool. That is one thing that I „added“ to the process of unraveling. As I am rather picky when it comes to the content of my yarn – most of the time I want more than 90% natural fibers – I decided to a little burning test to make sure I hadn’t bought an acrylic sweater. This test is quite easy, you find a chart online of the behavior of different fibers when burned, and then (in a safe environment!) burn a little piece of the yarn. In case of wool it should smell burnt hair and the residue is black, bubbly and can be easily crumbled. Of course you cant burn anything in the thrift store, but still, as recycling a sweater turned out to be quite time consuming, it is a nice way of making sure you end up with quality yarn.

DSC02274

DSC02276DSC02277

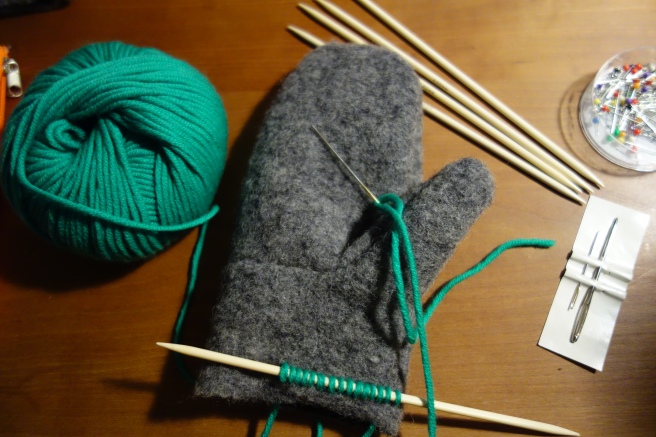
Winding the yarn goes quite fast, but is a rather dusty work – as spring is coming it might be nice to do that part outside! Soaking and drying the yarn took two nights, but that might depend on the yarn type and the weight of the yarn you have.

DSC02289

Now I just have to think about a nice project to start with my new yarn! But I guess that won’t be very hard. Recycling a sweater is such a satisfying project, and knowing what you did makes the wool even more special.


Project Summary:

Instruction booklet: 4€
Sweater: 6€

Total: 10€

Weekender Bag

Another project inspired by the Purl Soho Blog! They just really have the nicest things… This time it’s the Overnighter Bag. I especially loved the different shades of beautiful linen they used, in contrast to the natural cotton color of the handles and zipper. I didn’t buy the pattern, as I figured I could draw one myself, and it is actually quite easy, the shape of the bag is classical and straightforward.


DSC01842

I ordered the fabric online from Stoff und Stil, it’s a beautiful linen viscose mix that comes in a lot of beautiful shades, I chose light grey, dusty blue and navy. The zippers and bias tapes are also from Stoff und Stil, the cotton tape for the handles is from another shop. After I started planning out the bags, I realized, that the linen would not be sturdy enough for a bag, as the edge of a book or something sharp could easily poke a hole in the soft linen fabric. Luckily I had some simple cotton fabric, that I could use to line the bags to make them more stable.

DSC01759

DSC01786

DSC01779

The bag is basically made of two half-moon shapes, one rectangle for the bottom, smaller rectangles for the sides and a rectangle for the top, that is divided by the zipper. I just cut the same pattern pieces from the cotton fabric for the lining and pinned both fabric and lining together for the sewing process. First the zipper and the handles are attached, then the parts are sewn together.

DSC01787

DSC01795

DSC01797

All visible seams are finished with bias tape at the end, and this part was definitely the most exhausting in the whole project! First, all seam allowances have to be cut back (and its many layers of fabric…), then the bias tape is attached. My sewing machine definitely reached its limits, and I hand to help myself pushing the thicker parts with scissors. But the result is beautiful! Especially with the grey bag that I lined with black fabric, the white bias tape is creating a nice contrast.

DSC01871

DSC01838DSC01869

I kept the light blue one for myself and can’t wait to use it for my next weekend trip somewhere! I also had some fabric leftover from this project, I will write about what I made from it soon…

DSC01876

Project Summary (one bag):

Pattern (inspired by Purl Soho): Self-drafted
Fabric (mostly Stoff und Stil): 10€, lining 3€, zipper 1,50€, bias tape c.a. 2,50€, tape for the handles c.a. 5€

Total: 22€


Mittens with Knitted Cuffs

Shortly before Christmas I found this free tutorial for Felt Mittens with Knitted Cuffs on the Purl Soho blog. Their site is a true treasury of ideas, inspirations and tutorials! I already have quite a lot of other things bookmarked that I want to try out. The mittens are a super quick project and perfect for a last minute handmade gift. Winter is not over yet, and I have the suspicion that another wave of cold will hit us soon (at least here in central Europe…). So why not making them for yourself or as a gift before the cold season is over? …especially because it’s an easy way of introducing some color in the grey weather.

DSC01804

This little project combines sewing and knitting, which makes it perfect in my view. The main part of the mittens is cut and sewn from a soft felted wool fabric, according to the free pattern from Purl Soho. The one that I used is a knit wool blend from Stoff und Stil, for the knitted cuffs I used a flashy green merino wool yarn to have a nice contrast with the grey fabric. I really like how you can play with textures and colors with this pattern.

DSC01807

The first row of stitches is sewn on with a tapestry needle. My yarn was thicker than the one in the tutorial, so I only used 40 stitches (10 on each needle). The soft merino makes the mittens really nice to wear, especially if you are sensitive to scratchy wool (like me).

DSC01809

DSC01810

After the first row is done, I knitted the cuffs in a simple 2×2 rib. But I am sure it would be nice in a 1×1 rib, or even with small cables! The possibilities are endless. As knitting the cuffs only uses up very little yarn this could be a great way of getting rid of some leftovers from other winter wardrobe projects, same goes for the fabric!

Project Summary (two pairs):

Pattern: Purl Soho, for free
Fabric: Stoff und Stil, 7€
Yarn: Lana Grossa, 6€
Total: 13€

My First Archers

I love wearing button ups, layering them under a nice sweater or as sort of an ultra-light jacket in summer. However, I am not a fan at all of classical tailored feminine blouses… In the past I bought some shirts in the men’s department (but ultimately they never fit me well) and I tried my luck with sewing some more-or-less-improvised sleeveless button ups. I t just never was quite the right thing. And then, finally! I made my first Grainline Studio Archer button up, and what a success this pattern is! After seeing all these Archers on blogs and Instagram, I suspected already that it was a great pattern…

DSC02132DSC02143

And I directly made a second one! Jen’s step-by-step guide in the pattern booklet is very helpful and guides you very well through the whole process. Sewing up the Archer took me a long afternoon (minus sewing the buttonholes and sewing on the buttons… always takes me forever) and I am really happy with the results. I cut a straight size four (I was not so sure about the sizes in the beginning, as I am not really familiar with the US sizes), and I was quite surprised to see the finished shirt fitting me perfectly! It’s like it was made for me, really. The only thing that I will change next time is adding maybe two cm in the length. Both fabrics and buttons are from Stoff und Stil. The green one is a very basic and cheap cotton, and the one with the roses is a printed viscose (still working on my pattern placement skills…).

DSC02145


DSC02136

DSC02150

I will definitely make more! I already have some nice variations planned…

Ondawa Sweater

So I finished my first sweater in a very long time (i knit the last one in school, I think…), and I am really happy how it turned out! It’s Brooklyn Tweed’s Ondawa. The pattern was easy to follow, it is complicated enough to be interesting but not too tricky. The cables turn out so beautiful!

DSC02124

The pattern is easy to modify, which I did. I lengthened it a bit, so the sweater would be more useful in the cold winter here in Budapest, and I changed up the sleeve pattern, as I prefer long sleeves (again, I needed something warm…): After the first pattern segment I kept increasing two stitches every six rows until the sleeves were long enough. That turned out to be the perfect match to the original style, as they still have the slim fit but are not too tight.

DSC01602 DSC01592

The yarn I used is Baby Alpaca from Wolle Rödel, and the light grey really brings out the cables nicely. I really liked the easy construction of this sweater, basically just rectangles and the boxy fit is great!

DSC02117

DSC02121