

I made a brand new zine about making your own period underwear! You can find more new tips and tricks in it. You can read more about it here, and buy it in my Etsy shop!
Update! You can find a review no on how these held up.
A recent bloody disaster in the office, produced by a leaking menstrual cup, brought my thoughts back to period underwear. Not the one that every woman (or bleeding person, for that matter) supposedly has, in opposition, I guess, to sexy underwear or something. I do not own special period underwear, it all looks more or less the same and my washing machine works fine enough to clean the blood stains. However, after said morning in the office the need for some more protection entered my mind.
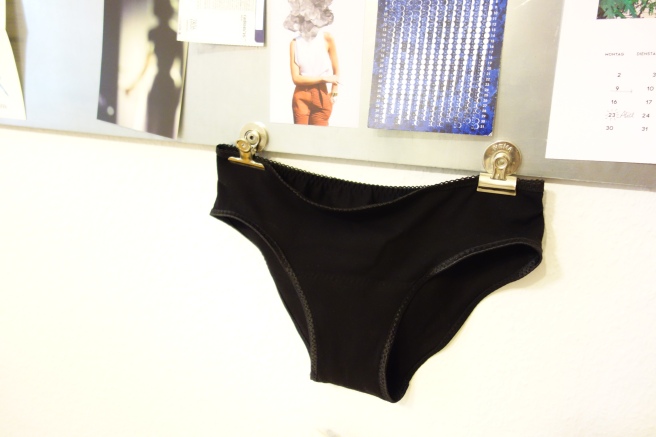
There are several commercially available products out there that made the news in the last years. First and probably most famous the Thinx underwear line, that is supposed to absorb up to one tampon’s worth of blood. Sadly, they do not have resellers in Europe, and after some horrible experiences with shipping fees, picking up packages at the customs control and paying the German VAT on top, I am reluctant to order things from the US. Also, in general, I love a good experimental DIY approach to things, and in this spirit I started my own period underwear project. If you are interested, there are several other DIY period ideas, such as handmade menstrual pads and crocheted tampons…
This sewing project is not really suitable for total beginners, but can be easily adapted for less experienced sewists. What you need is a dark stretchy jersey fabric with matching thread, preferrably with a four way stretch, underwear elastic (I used foldable elastic), a sewing machine and a small piece of some sort of absorbent material. For this I used some leftover cotton padding that I had from a quilting project, but hemp and bamboo are supposed to be an even better absorbent. This is a quite basic construction, and with respect to the characteristics of the fabric you might want to use another leak-proof layer. Out of the urgency of the project, I used what I had in my stash.

Start with your normal underpants pattern. You can trace your favorite pair or use a free pattern, such as the one by MakeBra. Assemble the pieces, but do not attach the elastic around the edges. Try on your almost-finished underwear and measure the length of the crotch lining. This should be a few centimeters longer than a standard crotch lining. Cut the lining pieces from your fabric and the absorbent lining.
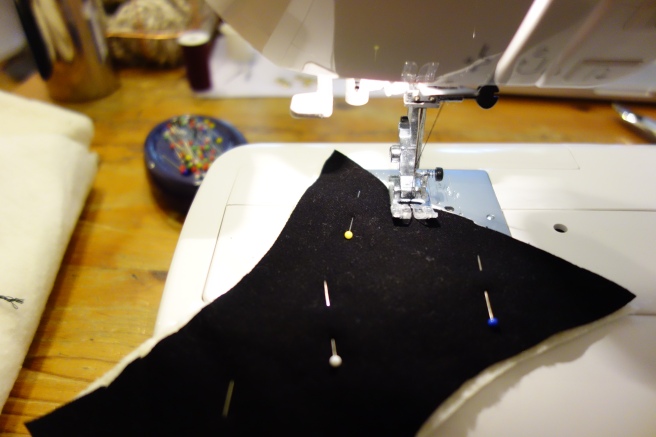
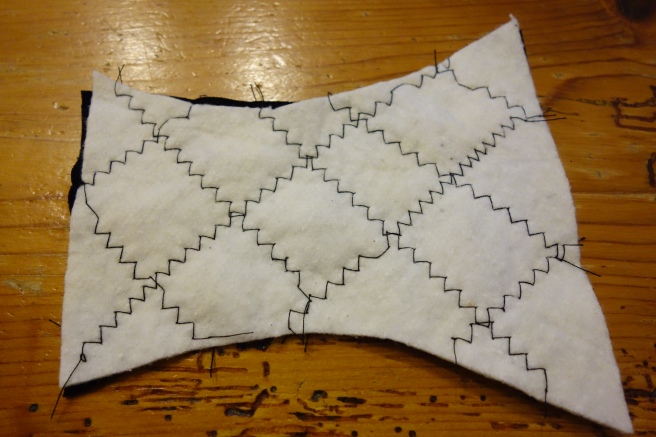
I made one pair with just another layer of cotton jersey and one with a piece of cotton padding, that I quilted to the top fabric layer for safety. Hem the front and back edges of the lining and pin it in place. I sewed the front and back edge to the panties with a zigzag stitch, to keep the seam elastic. For elastic fabrics and especially underwear, using a ballpoint or jersey needle is a good idea, as it does not break the fabric and avoids creating holes. The final step is finishing all the edges with elastic. And done!

I will continue testing my DIY period underwear, but so far it held up some minor bleeding, and washed out really well in the machine. Tell me how it goes for you and leave me recommendations for DIY period supplies in the comments!

Can we have an update on how well these have held up?
LikeLike
Hey Danielle! Thanks for the reminder! I wrote a review now, you can find the link on top of the post
LikeLike
Love this. I am considering making some for myself. I think I am going to experiment with fuller coverage through and maybe one with PUL. I am surprised at how few DIY period panty tutorials there are. Thanks for posting yours!
LikeLike